Home | Operation Venus Situation Report: A Christmas Star over Christmas in the Park »
September 11, 2005
How to make a money rose
This past June, my mom wanted to buy me some flowers for my graduation but the catch was that I had to choose my own bouquet. I looked around both on and offline, but I couldn't really find anything that I wanted to carry around on my graduation day. I thought briefly about taking the easy way out and ordering an orchid lei from Hawaii so that my hands would be free, but those cost about $75 to ship to Canada overnight by FedEx. I couldn't justify spending that much on something that would be thrown away in less than a week.
I never really liked flowers, especially cut flowers. They seem so pointless; so expensive, yet so temporal. So in my tradition of making fashion statements, I made a bouquet out of Canadian $5, $10 and $50 bills. This bouquet may cost many times more than a fresh bouquet (depending on the denominations of the bills you use) but it will last forever. If you ever grow tired of it, you can even disassemble it and spend it on something more practical.

Adapted from Dollar Bill Rose by Susan from Craft at Home, here are my refined step-by-step instructions on how to make a long stemmed rose out of money.
1. Materials
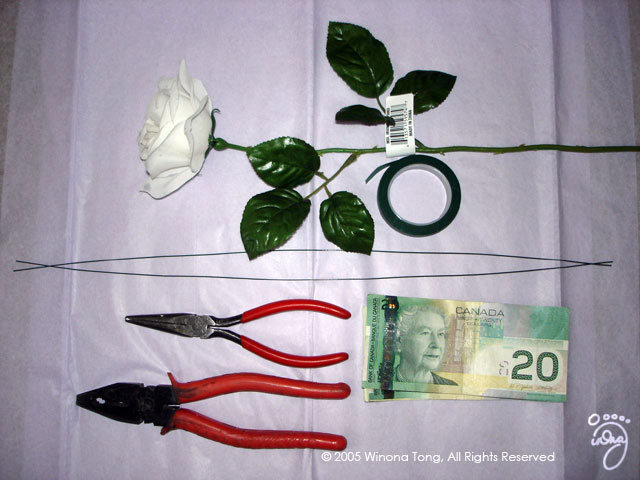
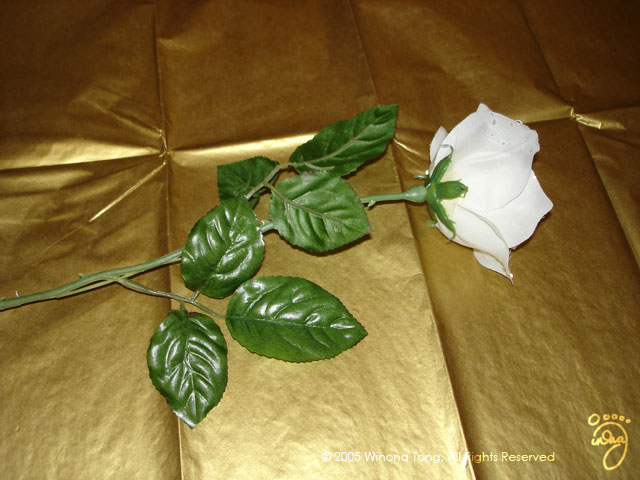
- 1 silk flower with removable leaves and plastic calyx (circle of leaves beneath petals)
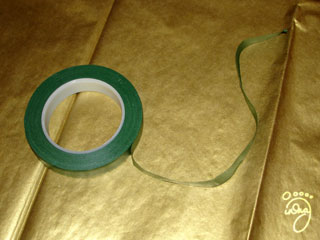
- 1 metre of floral tape
- 2 floral stem wires about 50 cm long (one should be 18 or 20 gauge, the other should be 22 or 24 gauge)
- 1 pair of longnose pliers
- 1 pair of linesman pliers (or anything rigid with a small flat surface)
- 5 crisp bills (the newer the better) Not shown:
- anything adhesive (glue, tape)
- any flat, rigid surface (pile of magazines on a table, cutting board)
2. Preparing the petals
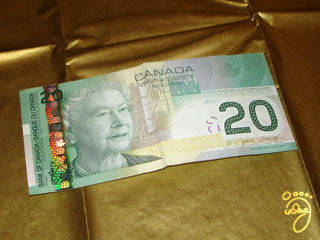 |
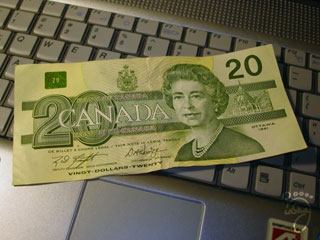
Become acquainted with the Canadian 20 dollar bill. I will be using this type of bill in the tutorial. It is not necessary for you to follow my choice of bill orientation exactly, but it will help in following my folding instructions if you know what I mean when I refer to the "front" or the "back" of the bill. This is the front. |
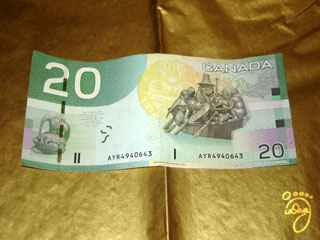 |
This is the back. |
 |
1. Fold bill in half with its back side facing outwards. |
 |
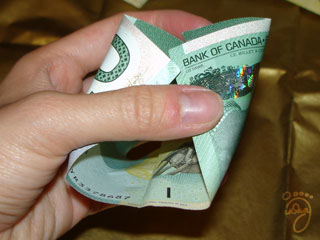
2. Lay the bill flat again with the back facing upwards. By rolling the corners tightly around one end of the thicker (18 or 20 gauge) wire, curl all 4 corners tightly upwards at approximately 45 degrees to the edges of the bill until the curls meet in the middle of the short sides of the bill. If you cannot find thick wire, something else round and narrow like the inside of a Bic pen will also work. |
 |
3. Make a small crease in the centre of the bill, perpendicular to the fold made in step 1. Do not fold the bill all the way lengthwise! |
 |
4. Pinch the crease from the bottom. |
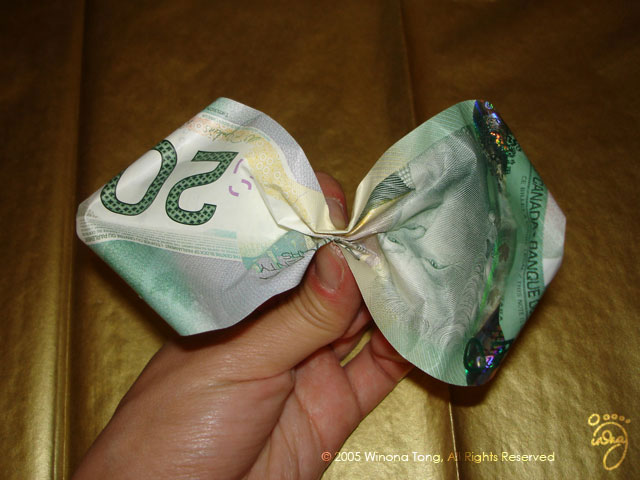 |
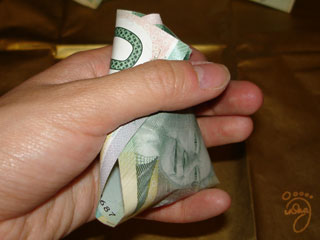
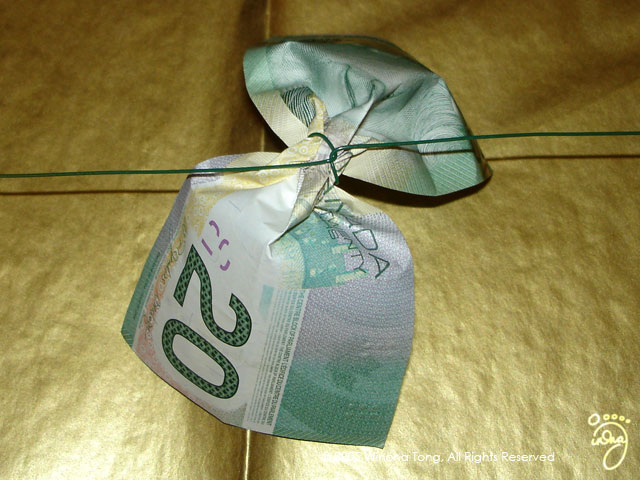
5. Crumple the middle of the bill by folding only the middle part like a fan, making sure that the 2 long edges point upwards, so that the front of the bill forms the inside of 2 cup-like shapes. |
 |
6. Flatten the creases in the middle of the bill, while still keeping the middle gathered together to make the cups more rounded. |
 |
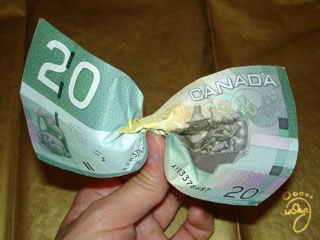
This is an alternate view of what the cups should look like. |
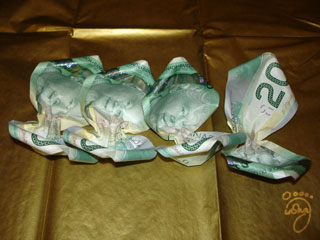 |
7. Repeat steps 1 - 6, three more times to make 4 pairs of petals in total. |
 |
8. Fold the last bill in half with the front facing outwards. |
 |
9. Lightly cup the bill in one hand with the front facing outwards. |
 |
10. Squeeze the bill a bit tighter to slightly curl the edges. This bill will form the unopened petals in the middle of the rose. |
 |
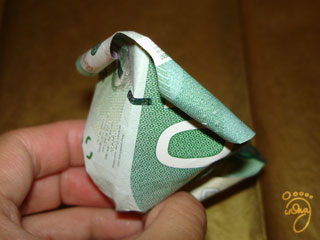
11. Similar to steps 3 - 5, crumple the middle of the bill by folding only the middle part like a fan, making sure that the 2 long edges point upwards. Now all the petals are ready to be assembled. |
3. Assembling the petals
 |
12. Take the thinner floral stem wire (22 or 24 gauge) and bend it in half. Take the bill with no tightly curled corners (the one created in steps 8 - 11) and put it between the wire with the inside of the cup facing the bend in the wire, and the pinched sides straddling the 2 ends of the folded wire as shown. |
 |
13. Push the crumpled part of the bill tightly into the bend in the wire. |
 |
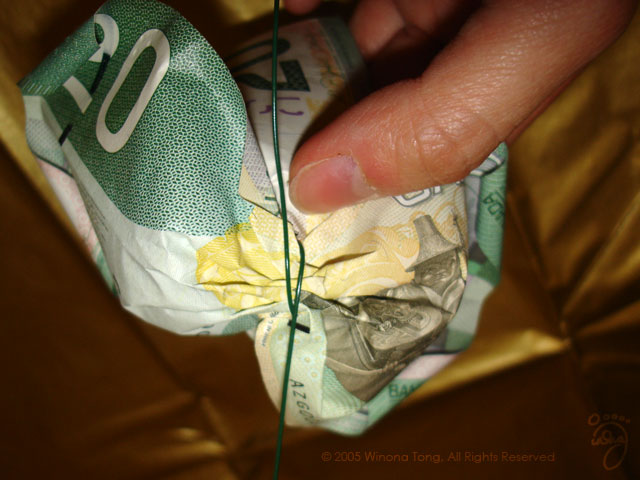
14. Bend the wires tightly around the crumpled centre so that they cross beneath the cup |
 |
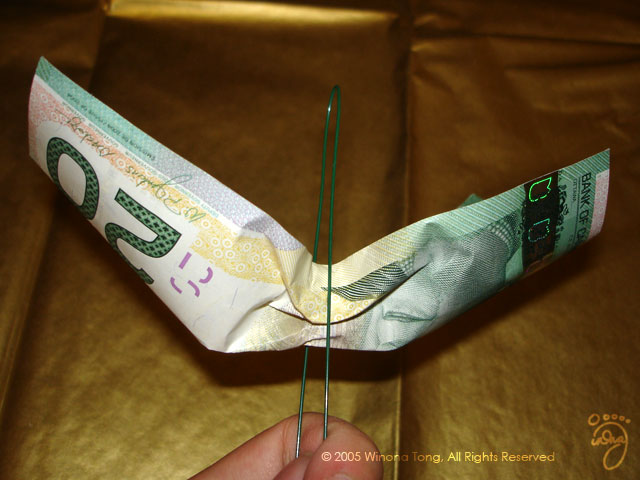
15. Intertwine the crossed wires by giving them a 90 degree twist. Take note of the direction in which you have twisted the wires. The wires should be twisted in the same direction in future steps. In this example, I have twisted them in a clockwise direction when looking up from the bottom of the flower. |
 |
16. Using the longnose pliers, bend the wires back upright with about a 1 cm gap between the 2 crossed wires. |
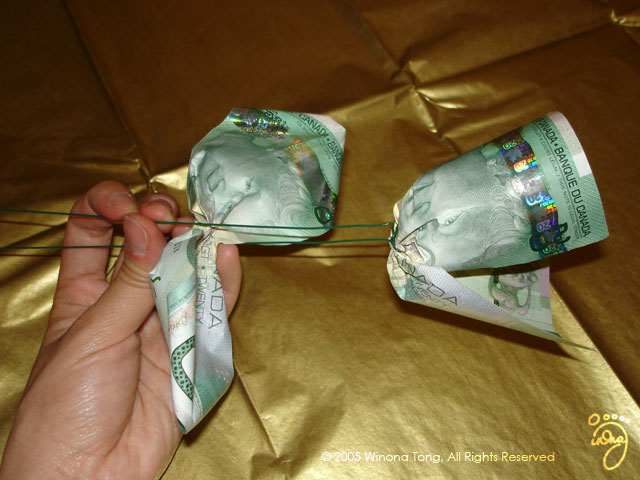 |
17. Take one of the curled petals and place it between the 2 wires with the cup facing upwards. |
 |
18. Tightly push the middle of the curled bill flat against the middle of the uncurled bill. |
 |
19. Fold down and cross the wires beneath the cup as in step 14. |
 |
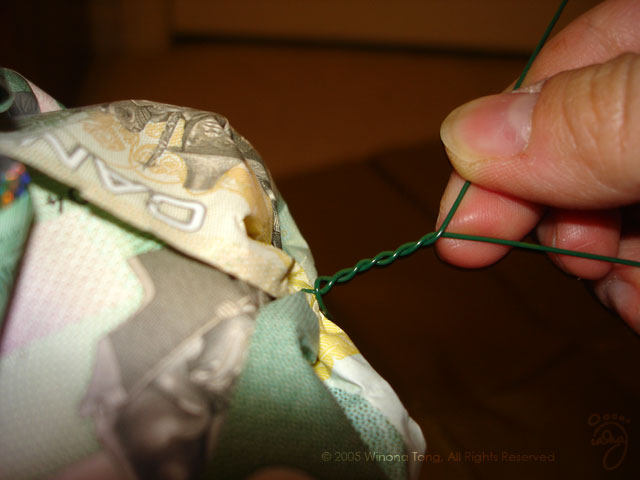
20. Intertwine the crossed wires by giving them a 90 degree twist as in step 15. |
 |
21. On a protected flat surface (pile of magazines on a table, cutting board) flatten the crossings of the wires by pushing the tip of the linesman pliers down on the crumpled centre portion of the flower. If you do not have lineman pliers, they can be substituted using anything rigid with a small flat surface, like a roll of dimes. |
 |
22. Repeat steps 16 - 21, three more times using the 3 remaining curled petals. |
 |
23. Using your fingers, bend the wires back upright, this time with no gap between the crossed wires. |
 |
24. Continue twisting the wires until the two ends are fully intertwined. |
 |
This is what the flower should look like after step 24 has been completed. |
4. Adding the finishing touches
 |
25. Roll one of the uncurled centre petals into a point and hold it in place using glue or tape. |
 |
26. Roll the second uncurled petal around the first point created in the previous step and glue or tape it into position. |
 |
27. Dismantle the silk flower |
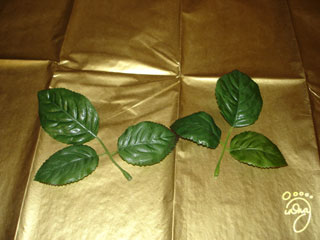 |
... by pulling off the leaves |
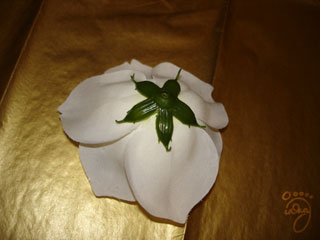 |
... plucking off the bloom |
 |
... and removing the calyx. |
 |
28. Tear off about 6 inches of floral tape. |
 |
29. Pull the floral tape taut in order to make it sticky. Very tightly wrap the floral tape around the wire 1 - 2 inches immediately beneath the flower. |
 |
For best results, make sure the build-up of floral tape is a bit fatter right beneath the flower so that the calyx stays in place. |
 |
30. Push the calyx up against the bottom of the flower. Use about 12 more inches of floral tape to secure the calyx and finish wrapping the rest of the wire. If desired, use more floral tape to secure some leaves to the stem. |
5. FAQ's
 |
Q: Is it illegal to mutilate money?
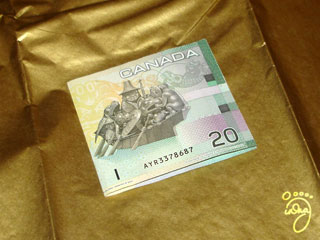
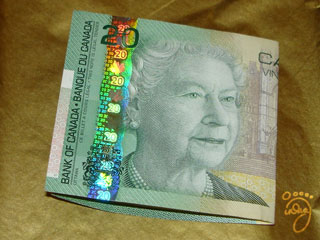
A: The Bank of Canada states that "A bank note is mutilated when its condition requires special examination to determine its value..." Furthermore, there is a law which states that it is illegal to mutilate coins in such a way that it becomes unrecognizable. Some say the same law can be applied to bank notes, but you may read the Bank of Canada's stance here. For US currency, it is illegal to mutilate, deface or otherwise alter currency for fraudulent purposes. Furthermore, it is illegal to mutilate currency in a way that renders it unfit to be reissued. For details, see this. In any case, if you're curious as to what your bills will look like after dismantling the rose, you can see an older bill that I've removed from a rose, to the left. The corners can be completely straightened out. The crease in the centre is most probably going to be permanent. If you're really anal about it, you can probably iron out the other wrinkles in the middle, but I didn't bother... I just smoothed it back out with my hands. In my opinion, it doesn't look too shabby. |
Wow, Amazing. Wow!
frig, 80 dollar rose .. i guess the red ones would be 200 .. that's enough for a nice electronic gizmo .. very cool !!
hi...i wanted 2 kno if this works with u.s bills?and thanx this is the best stie i found...
Yes, this works with US bills as well!
Really wonderfull, I have another version much more easy to make a money bouquet.
Nice to find this place :)
regards!
cool site and great i dea for a gift ^_^
My 84 year old aunt makes these for her church but cannot find the rose calyx any longer. Do you know where I could find some for her? Thanks. Nancy
I buy inexpensive silk flowers and take them apart for the calyx and leaves, but there are online stores that carry just the calyx:
http://www.lacis.com/catalog/data/n_tapewirefloralsupplies.html
http://www.harveyshobbyhut.com/shop/item.asp?itemid=284
I have been looking for a web site to teach myself how to make roses out of money. My godparents are celebrating their 50th wedding anniversary I plan on making them a beautiful bouquet. thanks again
Wow! Brilliant details (text and photos)! I was looking for ideas for a Valentine's Day gift for our teenaged daughter and this totally fits the bill : ) Thanks so much for a great idea and such detailed instructions!!
Awesome ��..thank you for sharing I will try to make one.
its amazing , just amazing .
i saw alot of web sites but this is the most easy with nice result .. so thanx again
Googled 'dollar bill roses' today to get directions; yours by far the most comprehensive and detailed. Will let you know how it turns out. About those calyxes: yard sales & garage sales are where I find them. Tired old silk flowers are usually begging for homes: at the end of the day when they're being thrown away, you can often get as many as you need for free.
Thanks so much for this. I have tried to make one out of dollar bills and just can't do it. Do you make these and sell them? I would like to purchase some if possible.
Can you tell me how much you normally sell these for if you make them all out of one dollar bills? Also how many do you usually put in the arrangement.
Thank you
Gabrielle
I don't make the roses for sale. (That is why I have posted this tutorial.)
COOL i tryed to make 1 it dident turn out as nice as yours il keep tryin!!!!!!!
This tutorial was really helpful, I loved it!
Great instruction.
Hey, thanks a lot for the tutorial. I made my mom a dozen, last night, for Mothers Day. I substituted the currency with old Chemistry and Statistics homework, though. It's nice to see that those classes finally paid off. And what an assortment of petals, right? :D
Thanks, again.
I just found this, made one, came out pretty good! Gave it to a 16 year old for her birthday.
I also made on from the link posted by another person....too cute. I was wondering how you would price this to make a bouquet for a gift for someone that wanted one. have to think about this. thanks again.
Bea
thanks alot man thanks i am gonna do a magic trick out of this money rose thanks again
That was kool that really helped me make the rose, with the pictures and the text! You really made it easy to make the rose by the way that u worded it. Thank you again.
i just want to say thanks for helping me remember how to make a money rose
THANK YOU FOR KEEPING THIS ITEM ON THE INTERNET! I couldn't even find this information in a large well known book store.
Wow...was looking for tutorials on how to make paper roses out of money..this is great! gonna make it for my mom's birthday present! thanks!!
your decoration is so pretty...do you have tutorial for it? thanks!
Hi Pete,
Unfortunately, I do not have a tutorial on flower/ bouquet arrangement because I'm not good at it. I came about what you see in the picture through a lot of trial and error, and I can't confidently say that I can repeat it, much less give people a formula to reproduce it.
You might find the following tutorials helpful in creating your bouquets:
http://www.expertvillage.com/interviews/wedding-bouquet.htm
http://www.expertvillage.com/interviews/bridal-bouquets.htm
Good luck with your project!
I was wondering if you knew how to do the leaves for the rose out of money...I have a friend who use to make these but, she cannot remember how.....
Thank You,
Ginger
I try to make one for my girl friend. Can you explain in details for the step 5 and 6 ? I can't make it, may be my finger is too big ...
Thanks ....
Eric
I just made one for my mother's retirement gift. Loved the idea. Mine did not come out as beautiful as yours...maybe next time! Thanks for posting!
thanks ill make one for my girl friend i need to make up a little bit thanks
hey where can you get foral wire? some1 email be back at brian-jai@hotmail.com need it soon
Great work !!!! How can i get a copy of this to my email.
P.S.: Keep up the good work.
rad.
Thankz alot for that. i did one for my mum's bday which she loves it so so xtremely much..
How funny to find this web site. My aunt and I were at her house trying to make a money tree. We couldn't figure out how to make a flower so we just played around after about 4 hours we came up with a rose all most exactly like yours. Thanks I appreciate being able to see what we did and how we did it. nancy
this us cool i really like and when i did make it it was easy
You are very kind to offer the directions to the public. Many thanks...
This idea would be really cool to make out of old music notes and give a bouqet to the musican, singer in your life.
You're tutorial is just what I was looking for! Thanks for sharing!
I wanted to make and money rose for my pastor's anniversary, could not have done it without you.
THANK YOU VERY MUCH!!!!!!!
Nadine
I was looking for something special. I found your Money rose. Thank YOu very much.
Thank you very much! This looks pretty complicated but I hope to try it when i have the time. Quick question however, do you know how to fold dollar bill tulips? Thanks again!
great idea. looking for other ideas to make out of money.
i have made the shirt. now need an idea for halloween,thanksgiving and christmas. If you would like to share any of your ideas, i certainly would appprecite it.
thanks,
Please contact me with your email address.
You have done a fabulous job of demonstrating the creation of money roses and I would like to include a little info about your page, etc at my website.
Thanks kindly,
Susan
Wow! It came out perfectly! The instructions and pictures were so easy to follow! It's a hit at the party and we will definitely make more of these to hand out as gifts! Thank you so much for taking the time to do this!
your site is wonderful!!!!! :) my roses came out perfect. your instructions are so detailed and easy to follow. :) thanks a bunch!
peoples, you have to turn it over after your curl the edges and before you pinch the center for the first 4 bills. That gave me some trouble the first time. My pettals were curled in instead of out (lol).
where can i get the flower stem wires?