<?xml version="1.0" encoding="utf-8"?>
<feed xmlns="http://www.w3.org/2005/Atom">
    <title>Winona Tong</title>
    <link rel="alternate" type="text/html" href="http://winonatong.com/" />
    <link rel="self" type="application/atom+xml" href="http://winonatong.com/atom.xml" />
    <id>tag:winonatong.com,2012-01-30://1</id>
    <updated>2017-02-10T00:38:29Z</updated>
    <subtitle>Level ?? Humanoid</subtitle>

<entry>
    <title>Situation Report: Cross-faction Starfleet Insignia Field Art Mission</title>
    <link rel="alternate" type="text/html" href="http://winonatong.com/archives/2015/03/situation-report-cross-faction-starfleet-insignia-.html" />
    <id>tag:winonatong.com,2015://1.1594</id>

    <published>2015-03-02T07:15:49Z</published>
    <updated>2017-02-10T00:38:29Z</updated>

    <summary> On Friday, February 27th, 2015 we learned of Leonard Nimoy&#8217;s passing. That very afternoon, a plan was hatched for Andorian (blue) and Orion (green) delegates to gather at Starfleet Headquarters in San Francisco, California to create a memorial for...</summary>
    <author>
        <name>Winona</name>
        
    </author>
    
    
    <content type="html" xml:lang="en" xml:base="http://winonatong.com/">
        <![CDATA[<p><img alt="animation.gif" src="http://winonatong.com/images/blog/animation.gif" width="500" height="500" class="mt-image-center" style="text-align: center; display: block; margin: 0 auto 20px;" /></p>

<p>On Friday, February 27th, 2015 we learned of Leonard Nimoy&#8217;s passing. That very afternoon, a plan was hatched for Andorian (blue) and Orion (green) delegates to gather at Starfleet Headquarters in San Francisco, California to create a memorial for the late Ambassador Spock.</p>

<p><img alt="IMG_0213-starfleet-field-art.jpg" src="http://winonatong.com/images/blog/IMG_0213-starfleet-field-art.jpg" width="500" class="mt-image-center" style="text-align: center; display: block; margin: 0 auto 20px;" /></p>

<p>12 Resistance Agents and 22 Enlightened Agents gathered at 2:00 PM on Sunday, March 1st to build a series of fields in the shape of the Starfleet Insignia.</p>

<p>The day started off with many green fields over a several block radius, and half as many Resistance Agents as Enlightened Agents on the ground to clear them. We split up into 3 cross-faction car teams, 1 agent on bike, 1 agent on rollerblades and the the rest on foot.</p>

<p>The plan was to have the agent on bike and the car teams clear the perimeter first so that a bounding box could be created to prevent feral agents from interfering with our artwork. This proved to be quite difficult. In a highly populated and portal-dense city such as San Francisco, one blocking link going down only provides an opportunity for another to go up.</p>

<p>In the end, we overcame the links from feral agents and completed the field art in under 3 hours.</p>

<p>This was my first time operating for a cross-faction event, and many valuable lessons were learned. I was absolutely amazed by how well everything came together. My approach going into this operation as a first-time cross-faction event organizer was that if I wanted the Resistance to trust me, I would have to trust them. I would also have to treat all team members equally, regardless of faction. This meant that I would dole out resources equally if anyone needed anything. (And yes, I did hand out XMPs to the Resistance.)</p>

<p>The location of the field art was not ideal, because a portion of it was in one of the busiest parts of town. The command center was also off the map due to safety and space constraints and could have benefited from a more central location.</p>

<p>A more equal turnout from both factions could have been achieved if given more time to promote the event. The success of our team proved that great teamwork can overcome any oversight in planning.</p>

<p>Special thanks to the following agents on the ground:<br />
@Nidaldik<br />
@Thedoc31<br />
@Littlesweetpea<br />
@IconMonkey<br />
@Wh1skeyB4nd1t72<br />
@Diziara<br />
@diamondCutter<br />
@sigkill<br />
@Holymeatballs<br />
@vimsical<br />
@Galerina<br />
@stolenveil<br />
@beyelzu<br />
@ensignsteve<br />
@sativa42<br />
@w1zard<br />
@SFHandyman<br />
@Athertoncivic<br />
@DoctorJarvis<br />
@mobivme<br />
@jasonwentcrazy<br />
@Cellissimo<br />
@Peregrinator<br />
@shayba<br />
@omael<br />
@ScoobyDoobious<br />
@Bonchesca<br />
@wolfthorn<br />
@AugustusMachin<br />
@ibarra<br />
@fatnino<br />
@turabelle<br />
@jaywobble<br />
@wayfaring</p>

<p>And the Resistance Ambassadors who rallied their troops even though they were out of town/country:</p>

<p>@dorkus<br />
@thekewe</p>

<p>Photos by @diziara</p>]]>
        
    </content>
</entry>

<entry>
    <title>Operation Venus Situation Report: A Christmas Star over Christmas in the Park</title>
    <link rel="alternate" type="text/html" href="http://winonatong.com/archives/2013/12/operation-venus-situation-report.html" />
    <id>tag:winonatong.com,2013://1.1593</id>

    <published>2013-12-10T08:24:12Z</published>
    <updated>2017-02-10T00:38:54Z</updated>

    <summary>The seeds for Operation Venus were sown almost half a year ago when the South Bay Enlightened Ladies decided to embark on a mission together. The beautiful summer and fall months proved to be a challenging time to gather a...</summary>
    <author>
        <name>Winona</name>
        
    </author>
    
    
    <content type="html" xml:lang="en" xml:base="http://winonatong.com/">
        <![CDATA[<p>The seeds for Operation Venus were sown almost half a year ago when the South Bay Enlightened Ladies decided to embark on a mission together. The beautiful summer and fall months proved to be a challenging time to gather a critical mass of agents, so an early December operation was planned.</p>

<p>
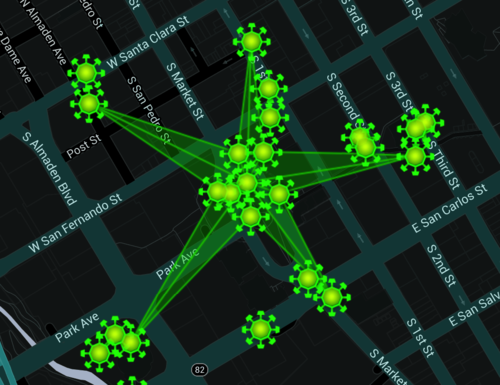
In the months leading up to Operation Venus, several potential operation plans were discussed. In the end, a seasonally appropriate star-shaped field over San Jose&#8217;s Christmas In The Park holiday fair was selected.</p>

<p><br />
<a href="http://winonatong.com/images/blog/star-field-plan.jpg"><img alt="star-field-plan.jpg" src="http://winonatong.com/assets_c/2013/12/star-field-plan-thumb-500x333-1221.jpg" width="500" height="333" class="mt-image-center" style="text-align: center; display: block; margin: 0 auto 20px;" /></a></p>

<p>Three days before the operation, an Enlightened building moratorium in downtown San Jose was requested. San Jose turned blue while agent Palko, the Enlightened guardian of San Jose anxiously awaited the completion of Operation Venus.  </p>

<p><span itemprop="description">
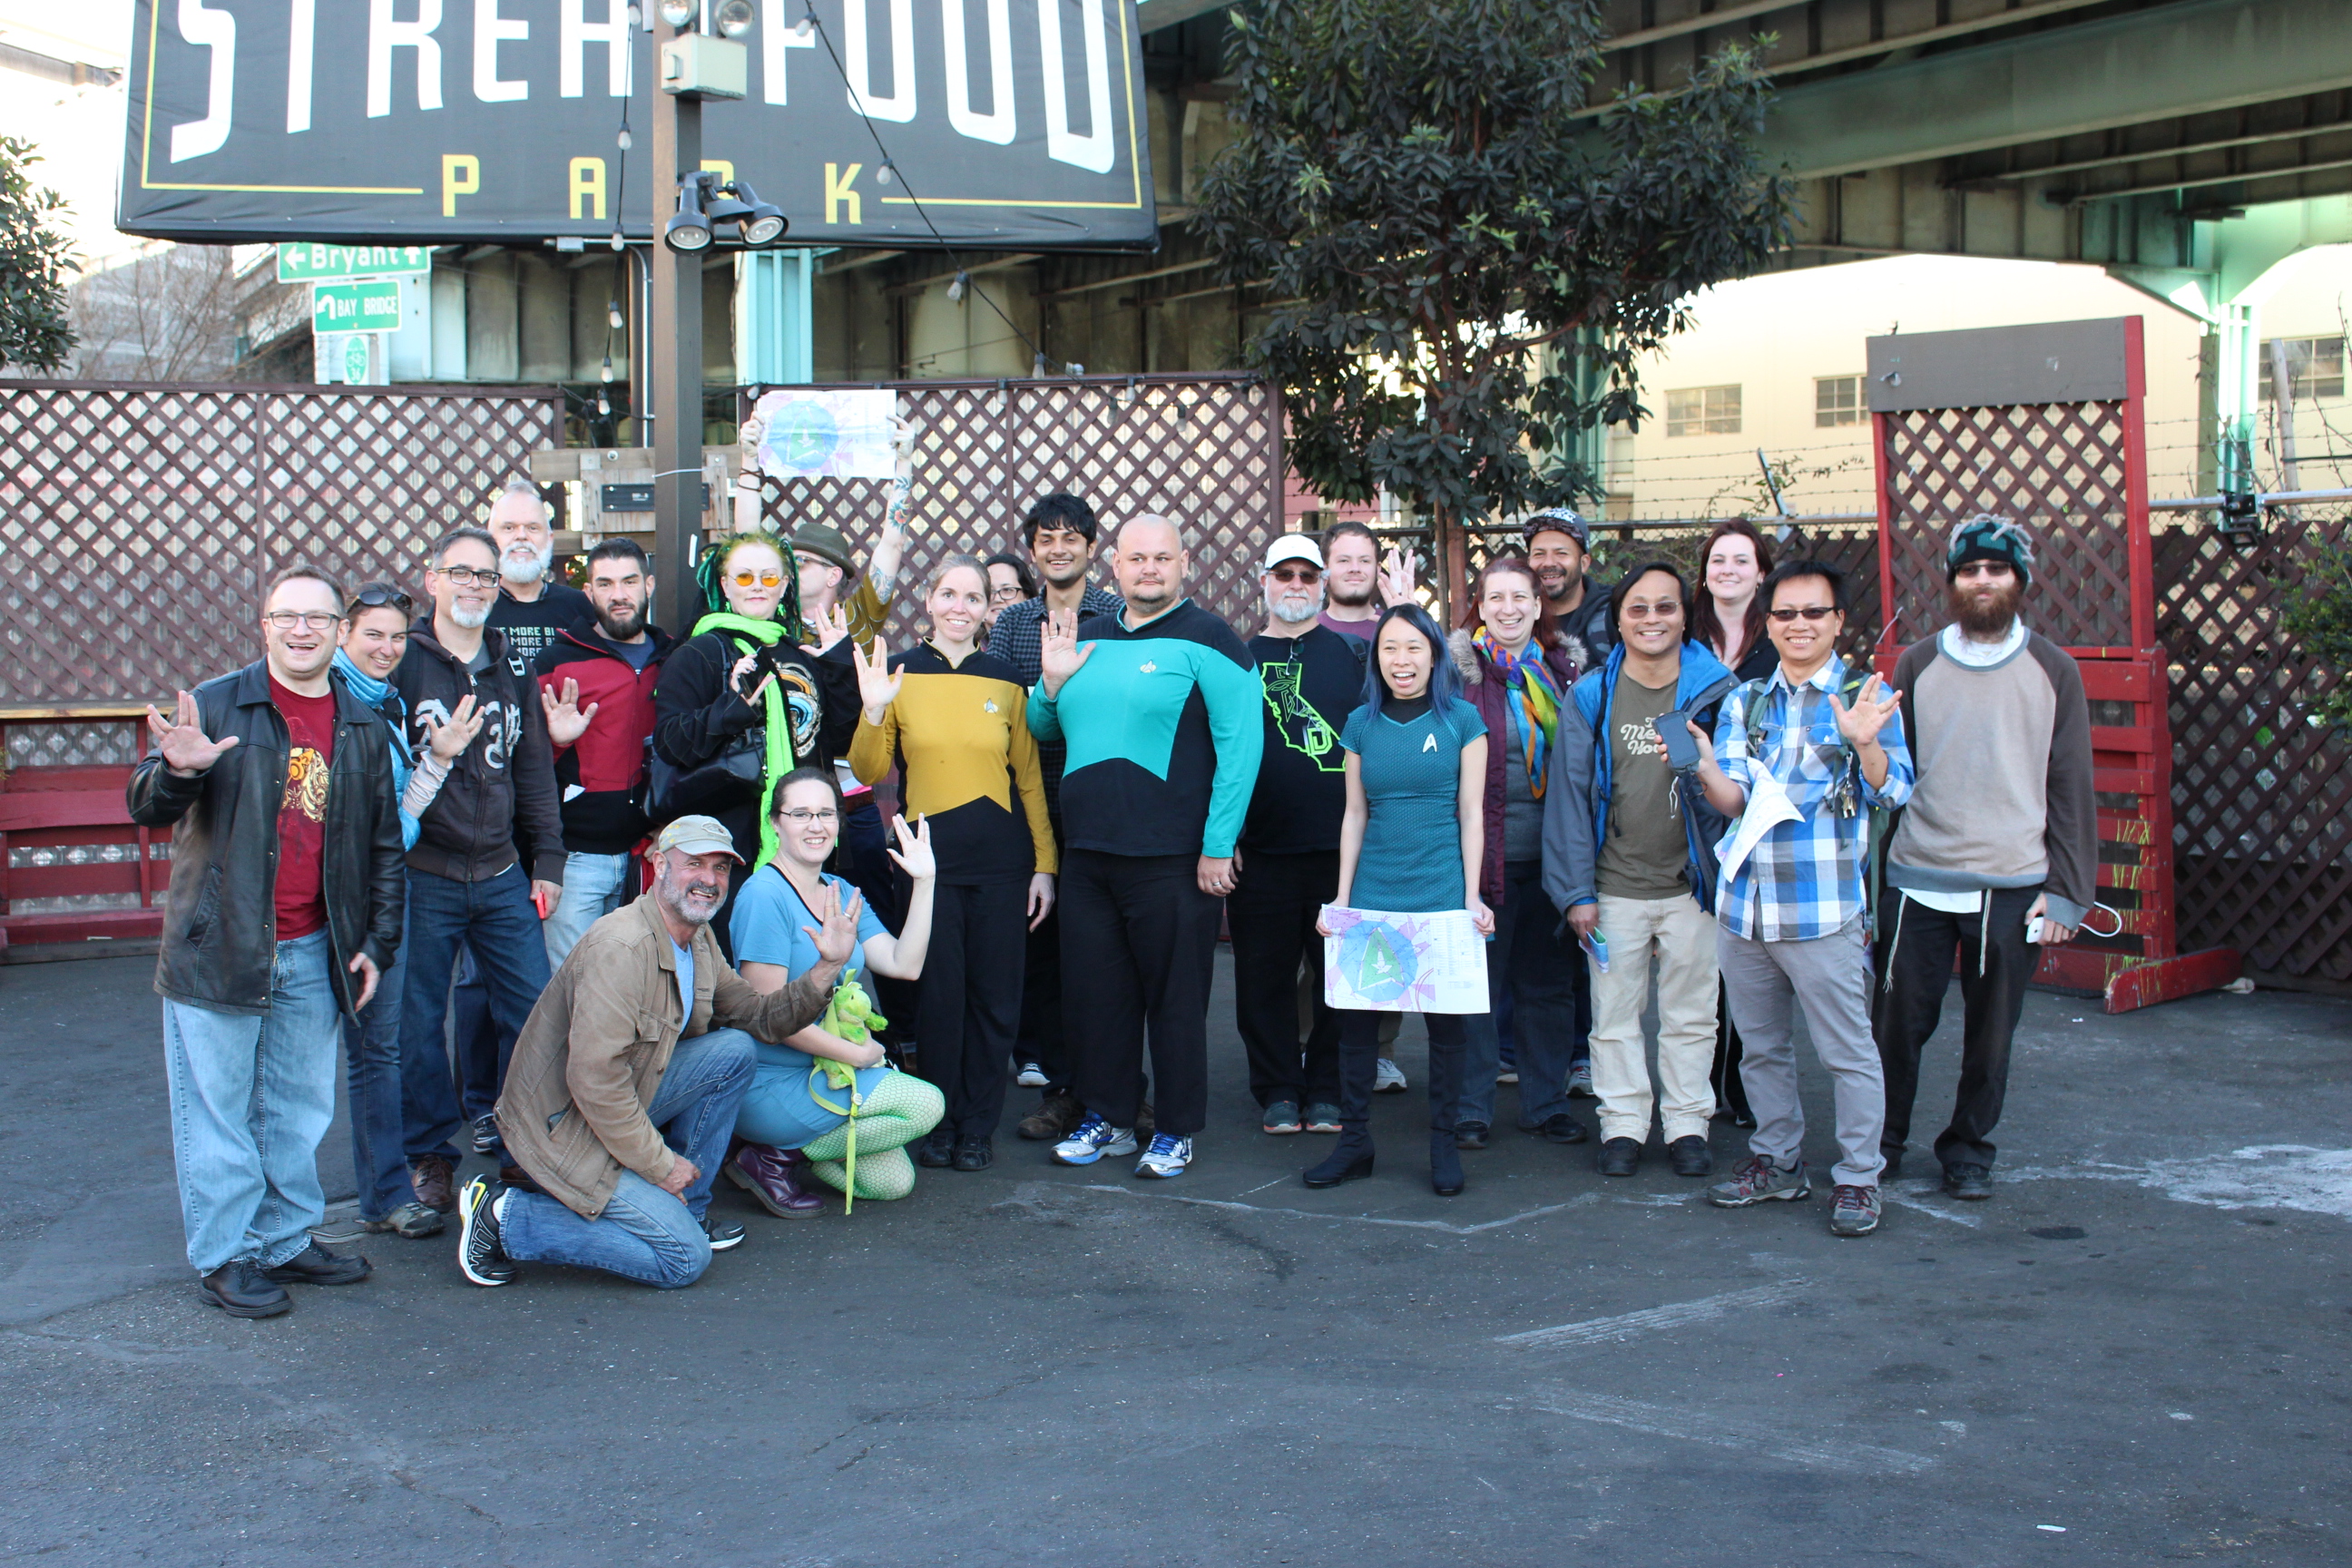
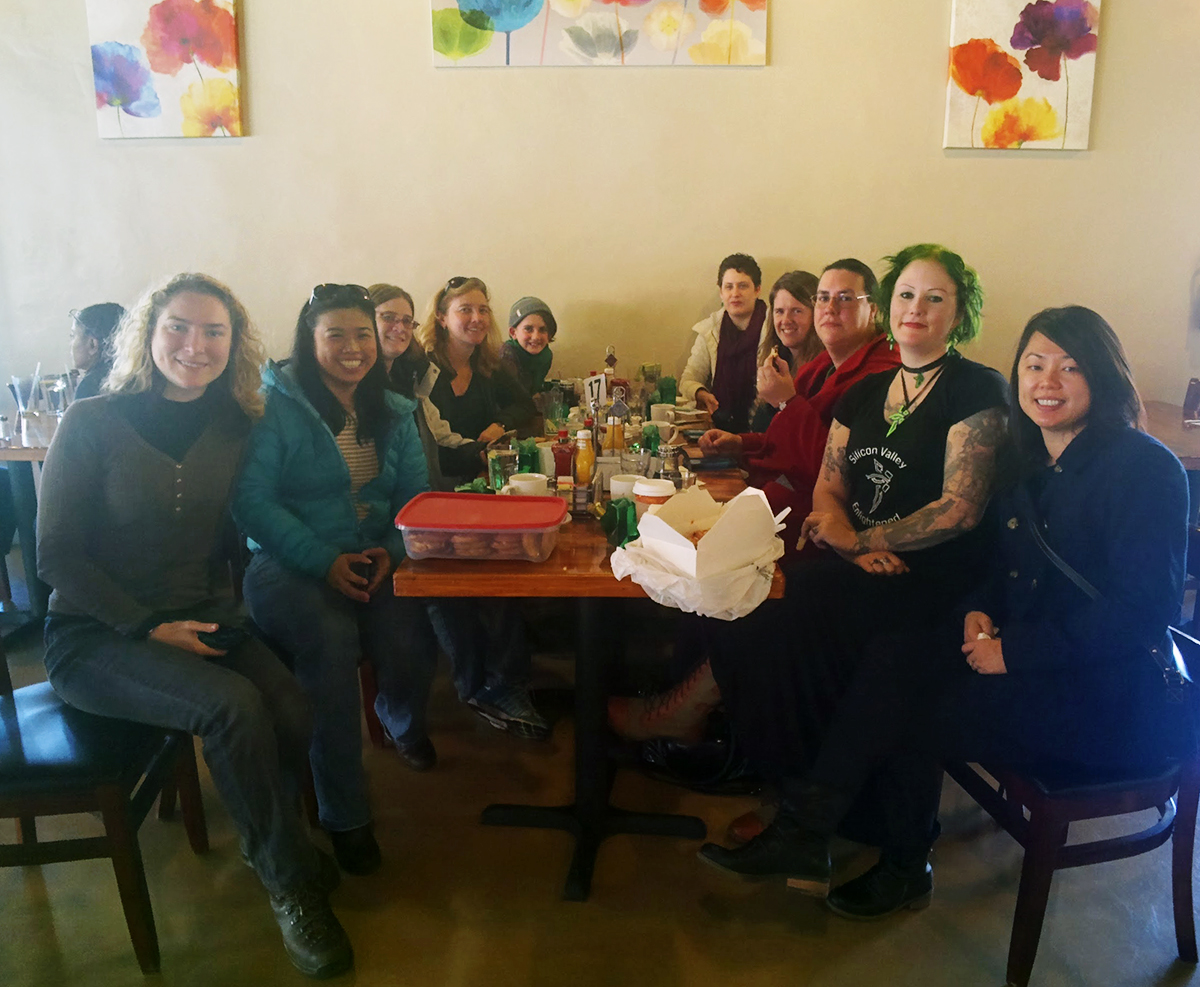
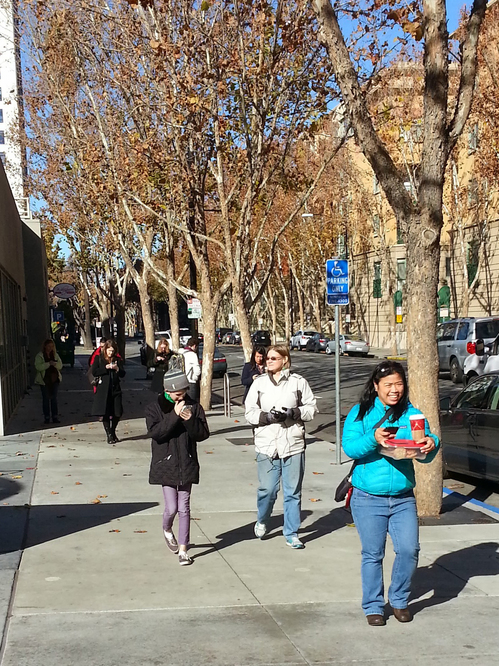
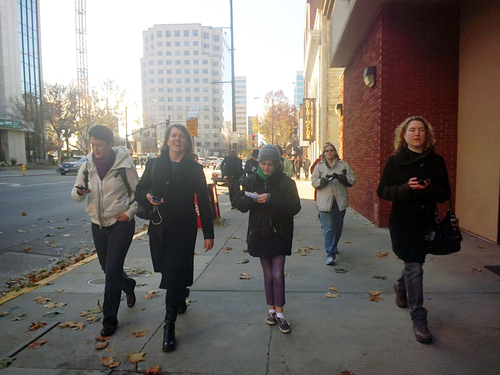
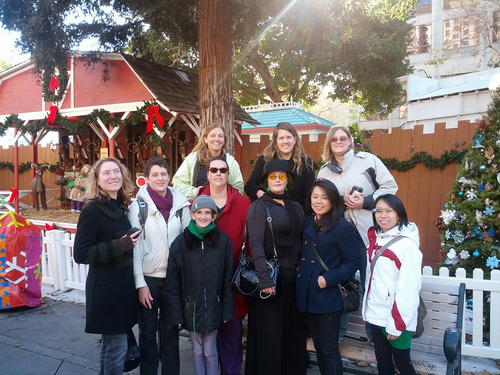
On December 7th at 10:00 am, 11 enlightened women gathered for a hearty brunch, followed by an afternoon of creating the first documented field art attempt in San Jose.</span></p>

<p><br />
<a href="http://winonatong.com/images/blog/operation-venus-whispers.jpg"><img alt="operation-venus-whispers.jpg" src="http://winonatong.com/assets_c/2013/12/operation-venus-whispers-thumb-500x411-1223.jpg" width="500" height="411" class="mt-image-center" style="text-align: center; display: block; margin: 0 auto 20px;" /></a></p>

<p>The agents who were involved included:<br />
aktse<br />
AMPA<br />
illiath<br />
leonora<br />
moosesquirrel<br />
SisterWife<br />
stolenveil<br />
sugaraddict<br />
synesthete<br />
Talinah<br />
zombwee</p>

<p>Operation readiness packets containing a map of the planned field art, shaper-inspired jewelry and nail polish from <a href="http://www.lucky13lacquer.com/">Lucky 13 Lacquer</a> were distributed.</p>

<p><br />
<a href="http://winonatong.com/images/blog/DSC_0089-swag.jpg"><img alt="DSC_0089-swag.jpg" src="http://winonatong.com/assets_c/2013/12/DSC_0089-swag-thumb-500x333-1225.jpg" width="500" height="333" class="mt-image-center" style="text-align: center; display: block; margin: 0 auto 20px;" /></a></p>

<p><br />
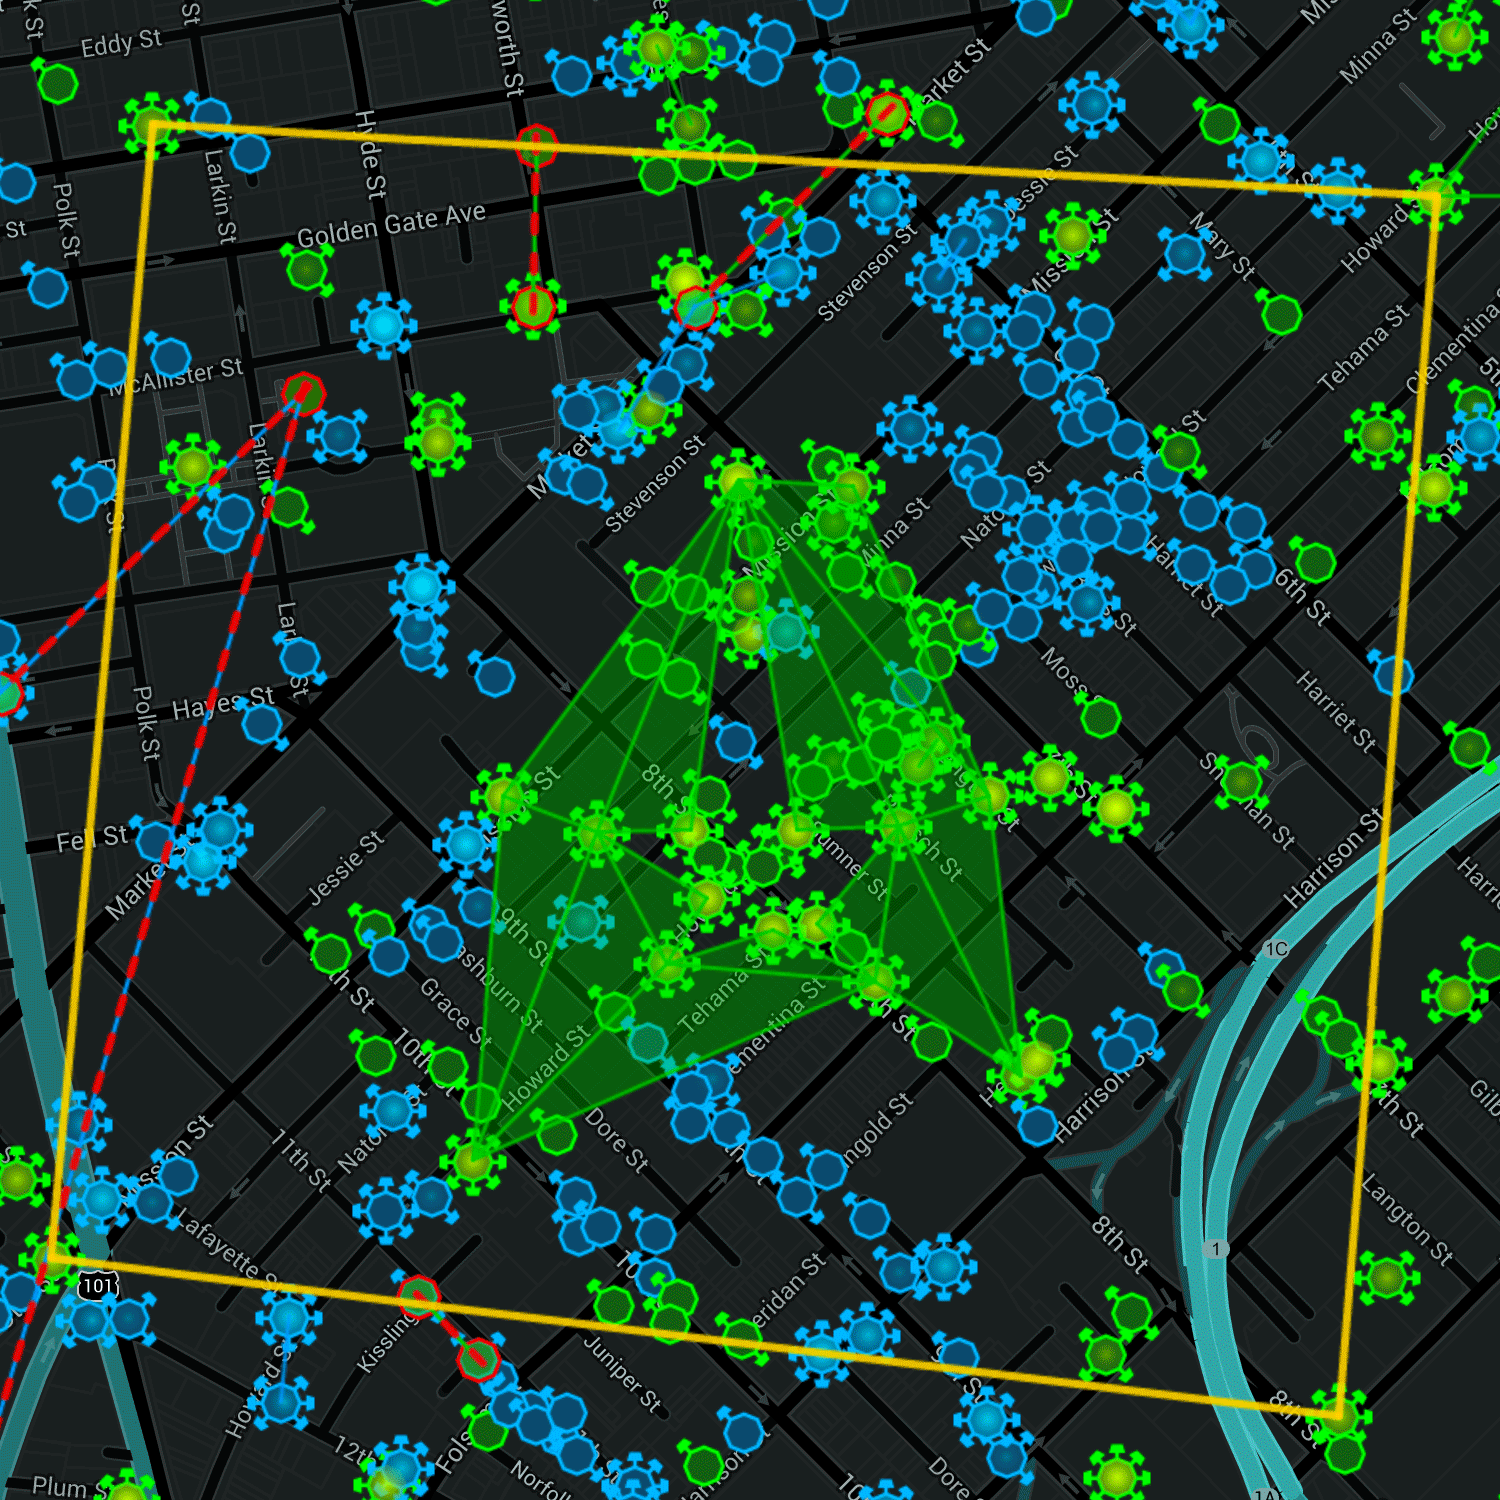
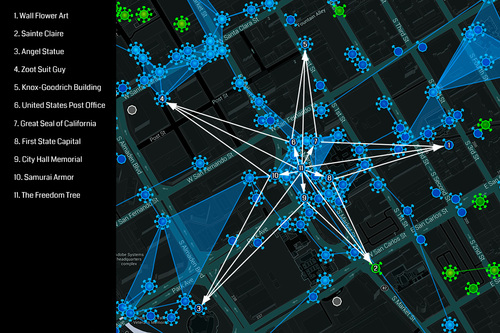
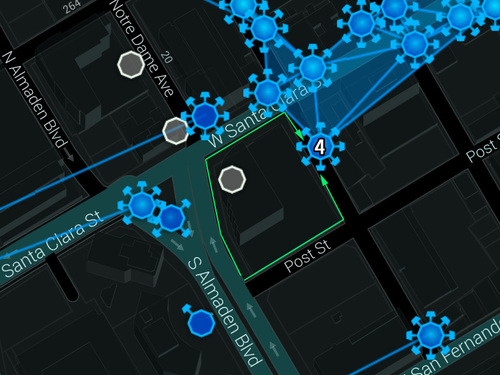
At noon, the crew set into action, first capturing, shielding and collecting keys for the <a href="http://www.ingress.com/intel?ll=37.333503,-121.885047&z=17&pll=37.333345,-121.886164">Wall Flower Art</a> portal.</p>

<p><br />
<a href="http://winonatong.com/images/blog/stolenveil-20131207_121201.jpg"><img alt="stolenveil-20131207_121201.jpg" src="http://winonatong.com/assets_c/2013/12/stolenveil-20131207_121201-thumb-500x666-1227.jpg" width="500" height="666" class="mt-image-center" style="text-align: center; display: block; margin: 0 auto 20px;" /></a></p>

<p>An attempt was made to turn all portals along the way into level 8 portals, but this slowed down the group considerably. There was a concern that since the penultimate 13 Magnus anomaly was happening the same afternoon, any level 8 portals and fields would attract the ire of the local Resistance agents. With a revised plan to head directly to the field anchors, clearing any blue portals, links and fields along the way, the ladies headed for Hotel <a href="http://www.ingress.com/intel?ll=37.333503,-121.885047&z=17&pll=37.330817,-121.888049">Sainte Claire</a> without delay.</p>

<p>At Hotel Sainte Claire, agent aktse&#8217;s health deteriorated in the unseasonally harsh weather, so the group bid her farewell with a final helping of her homemade chocolate chip cookies and hugs all around.</p>

<p>As the ladies continued on their way to <a href="http://www.ingress.com/intel?ll=37.333503,-121.885047&z=17&pll=37.329994,-121.892604">Angel Statue</a>, a long blue link was noticed, running the length of Market Street. This caused a bit of alarm. It was determined that one end of the link was <a href="http://www.ingress.com/intel?ll=37.333469,-121.88508&z=17&pll=37.333132,-121.890144">Modern World</a>, which was along the walking path. The group resumed the mission, making a note to clear the link as they approached Modern World.</p>

<p>The many road crossings and slow traffic lights made it a challenge to keep the entire group together. As the agents progressed towards <a href="http://www.ingress.com/intel?ll=37.333469,-121.88508&z=17&pll=37.334293,-121.893542">Zoot Suit Guy</a> the blue link and field concentration became denser, as the area was a Resistance stronghold. The group split up, with half of the women heading out from S. Almaden Boulevard and Post Street, along Post Street and up S. Almaden Avenue, and the second half heading up S. Almaden Boulevard, turning at W. Santa Clara Street, and going back down S. Almaden Avenue to rally at Zoot Suit Guy for the capture.</p>

<p><br />
<a href="http://winonatong.com/images/blog/star-field-split.jpg"><img alt="star-field-split.jpg" src="http://winonatong.com/assets_c/2013/12/star-field-split-thumb-500x375-1229.jpg" width="500" height="375" class="mt-image-center" style="text-align: center; display: block; margin: 0 auto 20px;" /></a></p>

<p>Shortly after Zoot Suit Guy was captured and shielded, it started getting attacked by agent k6bez. The ladies recharged Zoot Suit Guy, as they walked towards the <a href="http://www.ingress.com/intel?ll=37.334921,-121.891608&z=19&pll=37.335412,-121.889867">Knox-Goodrich Building</a> and k6bez stopped attacking.</p>

<p><br />
<a href="http://winonatong.com/images/blog/operation-venus-zsg-kgb-santa-clara.jpg"><img alt="operation-venus-zsg-kgb-santa-clara.jpg" src="http://winonatong.com/assets_c/2013/12/operation-venus-zsg-kgb-santa-clara-thumb-500x375-1231.jpg" width="500" height="375" class="mt-image-center" style="text-align: center; display: block; margin: 0 auto 20px;" /></a></p>

<p>After the capture of the Knox-Goodrich Building, the ladies went on to capture <a href="http://www.ingress.com/intel?ll=37.333881,-121.890664&z=19&pll=37.333398,-121.890167">United States Post Office</a>, <a href="http://www.ingress.com/intel?ll=37.333881,-121.890664&z=19&pll=37.333424,-121.8896">The Great Seal of California</a> and <a href="http://www.ingress.com/intel?ll=37.333002,-121.890047&z=19&pll=37.332665,-121.88924">First State Capital</a>. Links were made to the outermost tips of the star field (Zoot Suit Guy, Knox-Goodrich Building, Wall Flower Art and Sainte Claire) at each portal.</p>

<p>Just as a link from First State Capital to Sainte Claire was being made, a blocking link originating from <a href="http://www.ingress.com/intel?ll=37.331699,-121.887963&z=19&pll=37.331405,-121.886885">Oso&#8217;s Rebirth</a> created by friendly agent thaiguy appeared. The Enlightened ladies called out for thaiguy to stop linking, as agent stolenveil made a run down to Oso&#8217;s Rebirth to infect it with an ADA virus and destroy the link.</p>

<p>In the excitement of the blocking link's removal, an erroneous link from the similarly named <a href="http://www.ingress.com/intel?ll=37.332198,-121.886668&z=17&pll=37.332712,-121.8896">First State Capitol Building</a> was made to Sainte Claire. Another ADA virus was used to remove the link, and the correct link from First State Capital to Sainte Claire was thrown.</p>

<p>When agent stolenveil reconvened with the group, the ladies proceeded to capture <a href="http://www.ingress.com/intel?ll=37.331699,-121.887963&z=19&pll=37.332263,-121.889886">City Hall Memorial</a> and <a href="http://www.ingress.com/intel?ll=37.332149,-121.888534&z=19&pll=37.33272,-121.890638">Samurai Armor</a>.<br />
Links to the tips of the star field were made (Sainte Claire, Angel Statue, Zoot Suit Guy) and then the group descended upon the final, and most important portal: <a href="http://www.ingress.com/intel?ll=37.332149,-121.888534&z=19&pll=37.33287,-121.88997">Freedom Tree</a>.</p>

<p>The idea was that 10 of the links could be shot out from Freedom Tree to each of the corners of the star to complete the field. However, after a frenzy of linking, it was discovered that the order in which these links were made mattered. After 3 corners of the star field anchored by Angel Statue, Zoot Suit Guy and Knox-Goodrich Building were filled in, no more fields could be created from the center portal. 2 separate teams with keys to Freedom Tree were deployed to Wall Flower Art (leonora and sugaraddict) and Sainte Claire (SisterWife and synesthete) to link from the outside in. However, the team deployed to Sainte Claire discovered they had lost their key to Freedom Tree on the way, and agent AMPA was deployed to complete the field.</p>

<p>
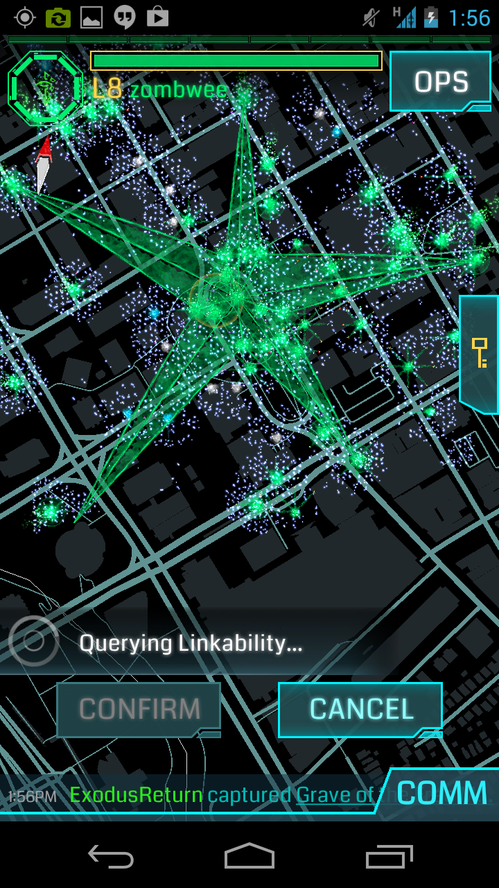
At 1:57 PM, the star field over Christmas in the Park was complete. Congratulatory messages and Christmas cheer poured in from agents who were keeping tabs on the Operation. Screen shots were made from the scanner, mobile intel, and a Chromebook on site.</p>

<p><br />
<a href="http://winonatong.com/images/blog/scanner-screen-shot.png"><img alt="scanner-screen-shot.png" src="http://winonatong.com/assets_c/2013/12/scanner-screen-shot-thumb-500x888-1233.png" width="500" height="888" class="mt-image-center" style="text-align: center; display: block; margin: 0 auto 20px;" /></a></p>

<p>Higher resolution screen shots were also requested from remote agents who were standing by at a computer.</p>

<p><br />
<a href="http://winonatong.com/images/blog/star.png"><img alt="star.png" src="http://winonatong.com/assets_c/2013/12/star-thumb-500x385-1235.png" width="500" height="385" class="mt-image-center" style="text-align: center; display: block; margin: 0 auto 20px;" /></a></p>

<p>As soon as visual confirmation of a satisfactory screen shot was made, agent thaiguy was given the all clear to resume his linking. Seconds after the all clear was posted on Faction COMM, Resistance agents peachytime and luigitime swooped in to destroy the Christmas star in a display of their Christmas spirit.</p>

<p>The Enlightened ladies retreated to a near by cafe to warm up, celebrate their successful mission and share stories of past operations.</p>

<p><br />
<a href="http://winonatong.com/images/blog/operation-venus-agents.png"><img alt="operation-venus-agents.png" src="http://winonatong.com/assets_c/2013/12/operation-venus-agents-thumb-500x375-1237.png" width="500" height="375" class="mt-image-center" style="text-align: center; display: block; margin: 0 auto 20px;" /></a></p>]]>
        
    </content>
</entry>

<entry>
    <title>How to make a money rose</title>
    <link rel="alternate" type="text/html" href="http://winonatong.com/archives/2005/09/how-to-make-a-money-rose.html" />
    <id>tag:www.winonatong.com,2005://1.207</id>

    <published>2005-09-12T06:53:47Z</published>
    <updated>2017-02-10T00:39:57Z</updated>

    <summary>This past June, my mom wanted to buy me some flowers for my graduation but the catch was that I had to choose my own bouquet. I looked around both on and offline, but I couldn&apos;t really find anything that...</summary>
    <author>
        <name>Winona</name>
        
    </author>
    
        <category term="Art" scheme="http://www.sixapart.com/ns/types#category" />
    
        <category term="DIY" scheme="http://www.sixapart.com/ns/types#category" />
    
        <category term="favourites" scheme="http://www.sixapart.com/ns/types#category" />
    
    
    <content type="html" xml:lang="en" xml:base="http://winonatong.com/">
        <![CDATA[<p>This past June, my mom wanted to buy me some flowers for my graduation but the catch was that I had to choose my own bouquet. I looked around both on and offline, but I couldn't really find anything that I wanted to carry around on my graduation day. I thought briefly about taking the easy way out and ordering an orchid lei from Hawaii so that my hands would be free, but those cost about $75 to ship to Canada overnight by FedEx. I couldn't justify spending that much on something that would be thrown away in less than a week.</p>

<p>I never really liked flowers, especially cut flowers. They seem so pointless; so expensive, yet so temporal. So in my tradition of making fashion statements, I made a bouquet out of Canadian $5, $10 and $50 bills. This bouquet may cost many times more than a fresh bouquet (depending on the denominations of the bills you use) but it will last forever. If you ever grow tired of it, you can even disassemble it and spend it on something more practical.</p>

<p><center><img src="/images/blog/rose/bouquet.jpg" width="450" height="338" alt="bouquet of roses"></center></p>

<p>Adapted from <a href="http://www.geocities.com/kraftproject/Instructional/moneyroses.html" target="link">Dollar Bill Rose by Susan from Craft at Home</a>, here are my refined step-by-step instructions on how to make a long stemmed rose out of money.</p>

<h3>1. Materials</h3>

<center><a href="/images/blog/rose/00-ingredients.jpg" target="magnify"><img src="/images/blog/rose/00-ingredients-th.jpg" width="320" height="240" alt="materials" border="1"></a></center>

<ol>
<li>1 silk flower with removable leaves and plastic calyx (circle of leaves beneath petals)</li><li>1 metre of floral tape</li>
<li>2 floral stem wires about 50 cm long (one should be 18 or 20 gauge, the other should be 22 or 24 gauge)</li>
<li>1 pair of longnose pliers</li>
<li>1 pair of linesman pliers (or anything rigid with a small flat surface)</li>
<li>5 crisp bills (the newer the better)</li>
Not shown:
<li>anything adhesive (glue, tape)</li>
<li>any flat, rigid surface (pile of magazines on a table, cutting board)</li>
</ol>
]]>
        <![CDATA[<br/>
<h3>2. Preparing the petals</h3>
<table border="0">
<tr valign="top">
<td><img src="/images/blog/rose/01-heads-th.jpg" width="320" height="240" alt="front of bill" border="1"></td>
<td align="top">Become acquainted with the Canadian 20 dollar bill. I will be using this type of bill in the tutorial. It is not necessary for you to follow my choice of bill orientation exactly, but it will help in following my folding instructions if you know what I mean when I refer to the "front" or the "back" of the bill. This is the front.
</td>
</tr>

<tr valign="top">
<td><img src="/images/blog/rose/02-tails-th.jpg" width="320" height="240" alt="back of bill" border="1"></td>
<td align="top">This is the back.</td>
</tr>

<tr valign="top">
<td><img src="/images/blog/rose/03-fold_petals-th.jpg" width="320" height="240" alt="" border="1"></td>
<td>1. Fold bill in half with its back side facing outwards.</td>
</tr>

<tr valign="top">
<td><a href="/images/blog/rose/04-curl_edges_to_midpoint.jpg" target="magnify"><img src="/images/blog/rose/04-curl_edges_to_midpoint-th.jpg" width="320" height="240" alt="" border="1"></a></td>
<td>2. Lay the bill flat again with the back facing upwards. By rolling the corners tightly around one end of the thicker (18 or 20 gauge) wire, curl all 4 corners <i><b>tightly</b></i> upwards at approximately 45 degrees to the edges of the bill until the curls meet in the middle of the short sides of the bill. If you cannot find thick wire, something else round and narrow like the inside of a Bic pen will also work.</td>
</tr>

<tr valign="top">
<td><a href="/images/blog/rose/05-make_crease.jpg" target="magnify"><img src="/images/blog/rose/05-make_crease-th.jpg" width="320" height="240" alt="" border="1"></a></td>
<td>3. Make a small crease in the centre of the bill, perpendicular to the fold made in step 1. <b>Do not</b> fold the bill all the way lengthwise!</td>
</tr>

<tr valign="top">
<td><a href="/images/blog/rose/06-pinch_crease.jpg" target="magnify"><img src="/images/blog/rose/06-pinch_crease-th.jpg" width="320" height="240" alt="" border="1"></a></td>
<td>4. Pinch the crease from the bottom.</td>
</tr>

<tr valign="top">
<td><a href="/images/blog/rose/07-crumple_centre.jpg" target="magnify"><img src="/images/blog/rose/07-crumple_centre-th.jpg" width="320" height="240" alt="" border="1"></a></td>
<td>5. Crumple the middle of the bill by folding only the middle part like a fan, making sure that the 2 long edges point upwards, so that the front of the bill forms the inside of 2 cup-like shapes.</td>
</tr>

<tr valign="top">
<td><a href="/images/blog/rose/08-flatten_creases.jpg" target="magnify"><img src="/images/blog/rose/08-flatten_creases-th.jpg" width="320" height="240" alt="" border="1"></a></td>
<td>6. Flatten the creases in the middle of the bill, while still keeping the middle gathered together to make the cups more rounded.</td>
</tr>

<tr valign="top">
<td><img src="/images/blog/rose/09-cup_alternate_view-th.jpg" width="320" height="240" alt="" border="1"></td>
<td>This is an alternate view of what the cups should look like.</td>
</tr>

<tr valign="top">
<td><img src="/images/blog/rose/10-repeat_3-9-th.jpg" width="320" height="240" alt="" border="1"></td>
<td>7. Repeat steps 1 - 6, three more times to make 4 pairs of petals in total.</td>
</tr>

<tr valign="top">
<td><img src="/images/blog/rose/11-fold_last_bill-th.jpg" width="320" height="240" alt="" border="1"></td>
<td>8. Fold the last bill in half with the front facing outwards.</td>
</tr>

<tr valign="top">
<td><img src="/images/blog/rose/12-cup_bill-th.jpg" width="320" height="240" alt="" border="1"></td>
<td>9. Lightly cup the bill in one hand with the front facing outwards.</td>
</tr>

<tr valign="top">
<td><img src="/images/blog/rose/13-squeeze_bill-th.jpg" width="320" height="240" alt="" border="1"></td>
<td>10. Squeeze the bill a bit tighter to slightly curl the edges. This bill will form the unopened petals in the middle of the rose.</td>
</tr>

<tr valign="top">
<td><img src="/images/blog/rose/14-crumple_middle-th.jpg" width="320" height="240" alt="" border="1"></td>
<td>11. Similar to steps 3 - 5, crumple the middle of the bill by folding only the middle part like a fan, making sure that the 2 long edges point upwards. Now all the petals are ready to be assembled.</td>
</tr>
</table>
<br/>
<h3>3. Assembling the petals</h3>
<table border="0">
<tr valign="top">
<td><a href="/images/blog/rose/15-fold_wire_insert_unrolled_bill.jpg" target="magnify"><img src="/images/blog/rose/15-fold_wire_insert_unrolled_bill-th.jpg" width="320" height="240" alt="" border="1"></a></td>
<td>12. Take the thinner floral stem wire (22 or 24 gauge) and bend it in half. Take the bill with no tightly curled corners (the one created in steps 8 - 11) and put it between the wire with the inside of the cup facing the bend in the wire, and the pinched sides straddling the 2 ends of the folded wire as shown.</td>
</tr>

<tr valign="top">
<td><a href="/images/blog/rose/16-push_cup_up_against_wire_bend.jpg" target="magnify"><img src="/images/blog/rose/16-push_cup_up_against_wire_bend-th.jpg" width="320" height="240" alt="" border="1"></a></td>
<td>13. Push the crumpled part of the bill tightly into the bend in the wire.</td>
</tr>

<tr valign="top">
<td><a href="/images/blog/rose/17-cross_wires_beneath_cup.jpg" target="magnify"><img src="/images/blog/rose/17-cross_wires_beneath_cup-th.jpg" width="320" height="240" alt="" border="1"></a></td>
<td>14. Bend the wires tightly around the crumpled centre so that they cross beneath the cup</td>
</tr>

<tr valign="top">
<td><a href="/images/blog/rose/18-twist_wires_90_degrees.jpg" target="magnify"><img src="/images/blog/rose/18-twist_wires_90_degrees-th.jpg" width="320" height="240" alt="" border="1"></a></td>
<td>15. Intertwine the crossed wires by giving them a 90 degree twist. Take note of the direction in which you have twisted the wires. The wires should be twisted in the same direction in future steps. In this example, I have twisted them in a clockwise direction when looking up from the bottom of the flower.</td>
</tr>

<tr valign="top">
<td><a href="/images/blog/rose/19-bend_wires_upright.jpg" target="magnify"><img src="/images/blog/rose/19-bend_wires_upright-th.jpg" width="320" height="240" alt="" border="1"></a></td>
<td>16. Using the longnose pliers, bend the wires back upright with about a 1 cm gap between the 2 crossed wires.</td>
</tr>

<tr valign="top">
<td><a href="/images/blog/rose/20-insert_curled_bill.jpg" target="magnify"><img src="/images/blog/rose/20-insert_curled_bill-th.jpg" width="320" height="240" alt="" border="1"></a></td>
<td>17. Take one of the curled petals and place it between the 2 wires with the cup facing upwards.</td>
</tr>

<tr valign="top">
<td><a href="/images/blog/rose/21-push_curled_bill_flat_against_uncurled.jpg" target="magnify"><img src="/images/blog/rose/21-push_curled_bill_flat_against_uncurled-th.jpg" width="320" height="240" alt="" border="1"></a></td>
<td>18. Tightly push the middle of the curled bill flat against the middle of the uncurled bill.</td>
</tr>

<tr valign="top">
<td><a href="/images/blog/rose/22-fold_down_and_cross_wires_beneath_cup.jpg" target="magnify"><img src="/images/blog/rose/22-fold_down_and_cross_wires_beneath_cup-th.jpg" width="320" height="240" alt="" border="1"></a></td>
<td>19. Fold down and cross the wires beneath the cup as in step 14.</td>
</tr>

<tr valign="top">
<td><a href="/images/blog/rose/23-twist_wires_90_degrees.jpg" target="magnify"><img src="/images/blog/rose/23-twist_wires_90_degrees-th.jpg" width="320" height="240" alt="" border="1"></a></td>
<td>20. Intertwine the crossed wires by giving them a 90 degree twist as in step 15.</td>
</tr>

<tr valign="top">
<td><a href="/images/blog/rose/24-flatten_wire_crossings.jpg" target="magnify"><img src="/images/blog/rose/24-flatten_wire_crossings-th.jpg" width="320" height="240" alt="" border="1"></a></td>
<td>21. On a protected flat surface (pile of magazines on a table, cutting board) flatten the crossings of the wires by pushing the tip of the linesman pliers down on the crumpled centre portion of the flower. If you do not have lineman pliers, they can be substituted using anything rigid with a small flat surface, like a roll of dimes.</td>
</tr>

<tr valign="top">
<td><a href="/images/blog/rose/25-bend_wires_upright.jpg" target="magnify"><img src="/images/blog/rose/25-bend_wires_upright-th.jpg" width="320" height="240" alt="" border="1"></a></td>
<td>22. Repeat steps 16 - 21, three more times using the 3 remaining curled petals.</td>
</tr>

<tr valign="top">
<td><a href="/images/blog/rose/26-bend_wires_upright.jpg" target="magnify"><img src="/images/blog/rose/26-bend_wires_upright-th.jpg" width="320" height="240" alt="" border="1"></a></td>
<td>23. Using your fingers, bend the wires back upright, this time with no gap between the crossed wires.</td>
</tr>

<tr valign="top">
<td><a href="/images/blog/rose/27-twist_entire_wire.jpg" target="magnify"><img src="/images/blog/rose/27-twist_entire_wire-th.jpg" width="320" height="240" alt="" border="1"></a></td>
<td>24. Continue twisting the wires until the two ends are fully intertwined.</td>
</tr>

<tr valign="top">
<td><a href="/images/blog/rose/28-finished_twisting_wires.jpg" target="magnify"><img src="/images/blog/rose/28-finished_twisting_wires-th.jpg" width="320" height="240" alt="" border="1"></a></td>
<td>This is what the flower should look like after step 24 has been completed.</td>
</tr>

</table>
<br/>
<h3>4. Adding the finishing touches</h3>
<table border="0">

<tr valign="top">
<td><a href="/images/blog/rose/29-glue_centre_bill_at_point.jpg" target="magnify"><img src="/images/blog/rose/29-glue_centre_bill_at_point-th.jpg" width="320" height="240" alt="" border="1"></a></td>
<td>25. Roll one of the uncurled centre petals into a point and hold it in place using glue or tape.</td>
</tr>

<tr valign="top">
<td><a href="/images/blog/rose/30-glue_centre_bill_at_point.jpg" target="magnify"><img src="/images/blog/rose/30-glue_centre_bill_at_point-th.jpg" width="320" height="240" alt="" border="1"></a></td>
<td>26. Roll the second uncurled petal around the first point created in the previous step and glue or tape it into position.</td>
</tr>

<tr valign="top">
<td><a href="/images/blog/rose/31-dismantle_silk_flower.jpg" target="magnify"><img src="/images/blog/rose/31-dismantle_silk_flower-th.jpg" width="320" height="240" alt="" border="1"></a></td>
<td>27. Dismantle the silk flower</td>
</tr>

<tr valign="top">
<td><img src="/images/blog/rose/32-dismantle_silk_flower-th.jpg" width="320" height="240" alt="" border="1"></td>
<td>... by pulling off the leaves</td>
</tr>

<tr valign="top">
<td><img src="/images/blog/rose/33-dismantle_silk_flower-th.jpg" width="320" height="240" alt="" border="1"></td>
<td>... plucking off the bloom</td>
</tr>

<tr valign="top">
<td><a href="/images/blog/rose/34-dismantle_silk_flower.jpg" target="magnify"><img src="/images/blog/rose/34-dismantle_silk_flower-th.jpg" width="320" height="240" alt="" border="1"></a></td>
<td>... and removing the calyx.</td>
</tr>

<tr valign="top">
<td><img src="/images/blog/rose/35-floral_tape-th.jpg" width="320" height="240" alt="" border="1"></td>
<td>28. Tear off about 6 inches of floral tape.</td>
</tr>

<tr valign="top">
<td><a href="/images/blog/rose/36-wrap_floral_tape.jpg" target="magnify"><img src="/images/blog/rose/36-wrap_floral_tape-th.jpg" width="320" height="240" alt="" border="1"></a></td>
<td>29. Pull the floral tape taut in order to make it sticky. Very tightly wrap the floral tape around the wire 1 - 2 inches immediately beneath the flower.</td>
</tr>

<tr valign="top">
<td><a href="/images/blog/rose/37-wrap_floral_tape_thicker.jpg" target="magnify"><img src="/images/blog/rose/37-wrap_floral_tape_thicker-th.jpg" width="320" height="240" alt="" border="1"></a></td>
<td>For best results, make sure the build-up of floral tape is a bit fatter right beneath the flower so that the calyx stays in place.</td>
</tr>

<tr valign="top">
<td><a href="/images/blog/rose/38-push_in_calyx.jpg" target="magnify"><img src="/images/blog/rose/38-push_in_calyx-th.jpg" width="320" height="240" alt="" border="1"></a></td>
<td>30. Push the calyx up against the bottom of the flower. Use about 12 more inches of floral tape to secure the calyx and finish wrapping the rest of the wire. If desired, use more floral tape to secure some leaves to the stem.</td>
</tr>
</table>
<br/>
<h3>5. FAQ's</h3>
<table border="0">
<tr valign="top">
<td><img src="/images/blog/rose/resulting_note.jpg" width="320" height="240" alt="" border="1"></td>
<td>Q: Is it illegal to mutilate money?
<br><br>
A: The <a href="http://bankofcanada.ca/en/banknotes/mutilated/index.html" target="link">Bank of Canada states that "A bank note is mutilated when its condition requires special examination to determine its value..."</a> Furthermore, there is a law which states that it is illegal to mutilate coins in such a way that it becomes unrecognizable. Some say the same law can be applied to bank notes, but you may <a href="http://www.cdn-money.com/cdnmoney/servlet/cmtHelp?help=bill-faq#illegal" target="link">read the Bank of Canada's stance here</a>.
<br><br>
For US currency, it is illegal to mutilate, deface or otherwise alter currency for fraudulent purposes. Furthermore, it is illegal to mutilate currency in a way that renders it unfit to be reissued. For details, <a href="http://answers.google.com/answers/threadview?id=426715" target="link">see this</a>.
<br><br>
In any case, if you're curious as to what your bills will look like after dismantling the rose, you can see an older bill that I've removed from a rose, to the left. The corners can be completely straightened out.  The crease in the centre is most probably going to be permanent. If you're really anal about it, you can probably iron out the other wrinkles in the middle, but I didn't bother... I just smoothed it back out with my hands. In my opinion, it doesn't look too shabby.
</td>
</tr>
</table>]]>
    </content>
</entry>

</feed>
